This post provide
printer support to Install new ink tank. To Install new ink tank follow the step given below
Check the Proper Order of the Tanks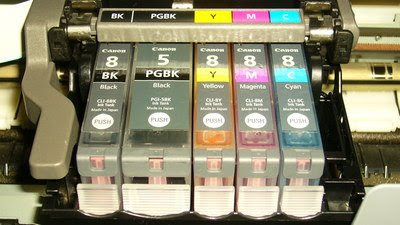
Ink tanks need to be installed in a certain arrangement, as noted in your printer’s user guide. For the Canon Pixma, the proper arrangement from left to right is Black 8, Black 5, Yellow 8, Magenta 8, and Cyan 8.
Remove the Plastic Wrapper from the Ink Tank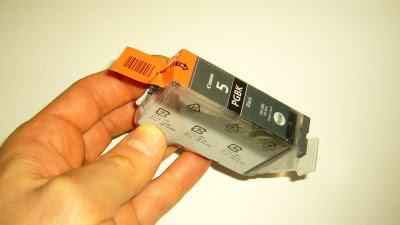
Tear the plastic wrapper off the ink tank by pulling down on the orange strip. Be careful not to touch the metal chip at the bottom of the tank.
Remove the Orange Protective Cap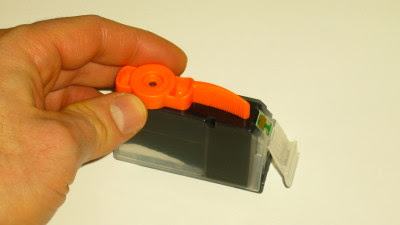
Take off the protective plastic cap by turning the plastic handle counterclockwise.
Turn the Printer On and Lift the Cover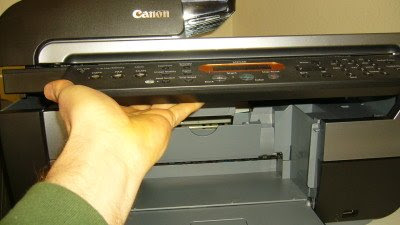
Turn your printer on, and lift the cover. Make sure you're not just lifting the top cover that provides access to the glass copy plate. Lift from below the control panel.
Open the Inner Cover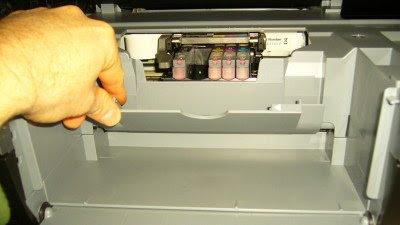
The ink-tank tray will move toward the center of the printer, giving access to the ink-jet tanks. Open the inner cover by pulling it toward you.
Push the Ink Tank Into Place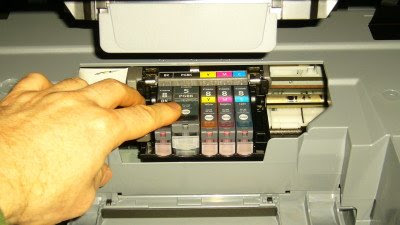
Push the front of the ink tank until the tank snaps into place. It will light up when it’s in correctly.
Close the Inner Cover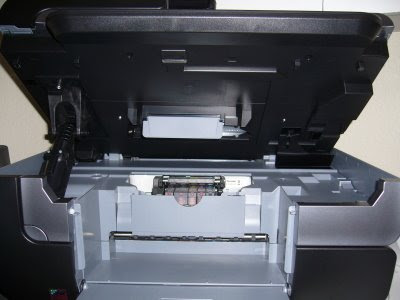
Push the inner cover closed before closing the printer cover.
Close the Printer Cover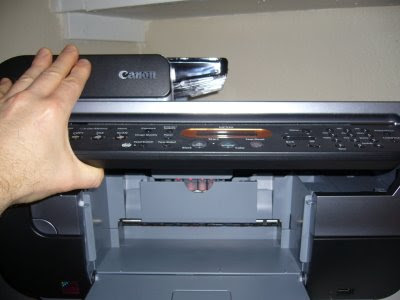
Gently close the printer cover until it locks in place.
This post provide
printer support to troubleshoot printing problems in Windows 2000 and in Windows Server 2003. To add a network printer managed by Windows NT 4.0 to a Windows 2000-based computer,
Follow these steps: 1. On the Windows 2000-based computer, install the printer locally on LPT1.
2. Click Start, point to Settings, and then click Printers.
3. Right-click the printer, and then click Properties.
4. On to the Ports tab, click LPT1.
5. Click Add Port.
6. Double-click Local Ports.
7. Type \\servername\printershare, where servername is the name of the server and printershare is the name of the printer share.
8. Click OK.
Printers that come ready for networking typically have a network adapter installed. Check your printer’s manual for more information, but printers that are ready to be connected to a wired network have a special jack called RJ-45 installed, which looks similar to a regular phone jack, just bigger.
In simplest terms, printers connect to wired networks through the router. One of the plugs goes into the router, and the other end goes into the printer’s jack. When all the pieces are restarted, you’ll need to
install print driver on all the PCs that will use the printer. This can usually be found on the CD that came with the printer (as well as on the manufacturer’s Web site).
WirelessIf your printer is wireless-enabled, you don’t have to connect any cables to it at all. You will need to get it recognized by the network, meaning that if you have security features enabled on your wireless router (and you should), you’ll need to share those with the printer. Consult the printer’s manual for the details, as this process is different from printer to printer.
Print ServersEven printers that aren’t network-enabled out of the box can often be networked by using a print server, a device that connects to your router and your printer. This lets the printer be shared by any computer on the network.
BluetoothBluetooth is a short-range wireless protocol that many PCs and cell phones use (for a wireless headset, for example). You can find many printers that can be Bluetooth-enabled as well, so you can print from your phone or (if you're not too far away) your laptop. It's unlikely that a printer will come with Bluetooth built in, so you'll need an adapter. These are thumb drives that plug right into the printer's USB port. If you intend to print from your phone, Bluetooth is a handy option.
Sharing a PrinterThe Printing Preferences menu for your printer will give you an option to share the printer if it’s network ready. This process is usually quite simple: open the printer’s properties (in Windows you’ll open the Control Panel, choose Printers and Other Hardware, and then View Installed Printers) and look for a tab called “Sharing.” You’ll need to give the printer a name so that the other computers on the network can find it.
This post provide further information to
fix printer problems if Print Operators Members Cannot Add Printer Driver on Domain Controller .
Error: Printer driver was not installed - access denied Cause: When you add the printer driver, Windows 2000 copies the printer's .inf file to the
%SystemRoot%\Inf folder. However, members of the Print Operators group do not
have permission to write to the %SystemRoot%\Inf folder, and access is denied.
Details Resolution: Use one of the following workarounds to install the printer driver:
1. Install the printer driver while you are logged on as an administrator or a member
of the Server Operators group.
2. Give members of the Print Operators group Write permission on the
%SystemRoot%\Inf folder.
3. Copy the .inf file to the %SystemRoot%\Inf folder in advance while you are logged
on as an administrator or a member of the Server Operator group.
New York, NY, May 11th, 2009 : iYogi, a global direct to consumer and small business remote technical support provider, today announced it’s acquisition of Clean Machine Inc, a provider of remotely administered PC security and performance management services. Clean Machine will operate as a separate brand under the iYogi services umbrella along with the recently lunched Support Dock (www.supportdock.com) and its comprehensive range of 24/7 technical support services for computers, printers, MP3 players, digital camera, routers, servers and more than 100 software applications. Larry Gordon, Founder of Clean Machine is appointed as the President of Global Channel Sales for iYogi.
iYogi will integrate technology and innovation that Clean Machine Inc. has developed for delivering an enhanced service experience by proactively managing the health and security for PC's and Apple Computers. This acquisition also broadens iYogi's access to key markets through Clean Machine's existing partnerships. Larry Gordon's past experience and successful track record will accelerate iYogi's expansion through his focus on global alliances.
Commenting on the acquisition of Clean Machine Inc., Uday Challu, CEO & Co-founder of iYogi, said,
"This acquisition will help iYogi to enhance our customer experience and extend our market reach to the millions of consumers that are challenged by the increasingly complex technology environment. Clean Machine's proactive maintenance and management of PCs in home and small business environment will be our launch platform for building the next generation of managed services for consumers."
"We are delighted to have Larry spearheading partnerships and global alliances for iYogi. His incredible experience in marketing, sales and building global alliances will help forge partnerships with retailers, multiple service operators, software publishers, original equipment manufacturers (OEM) and other such companies that are at the frontlines for managing tech support issues for consumers and small businesses",
added Challu.
With more than 20 years of experience, Larry Gordon has played a variety of strategic roles in marketing, sales and building alliances. Larry was the Executive Vice President at Capgemini and Kanbay. He was also VP of Global Marketing for Cognizant (Nasdaq: CTSH), a leader in global IT services and Director of Marketing for New York based Information Builders.
"I am excited to join a company that shares a common mission to Clean Machine in creating a global brand for delivering the best technical support to consumers and small businesses. We also share a common approach of utilizing highly skilled talent with leading edge tools, thereby delivering services at incredible price-points, with high margins for our partners",
said Larry Gordon, the newly appointed President of Global Channel Sales at iYogi.
ABOUT IYOGI
Headquartered in Gurgaon, India with offices in New York, USA, iYogi provides personalized computer support for consumers and small businesses in United States, United Kingdom, Canada and Australia. IYogi's 24/7 phone and remote technical assistance, spans across a comprehensive range of technologies we use every day from a wide range of vendors. Utilizing its proprietary technology iMantra , and highly qualified technicians, iYogi delivers amongst the highest benchmarks for resolution and customer satisfaction. iYogi is privately held and funded by SAP Ventures, Canaan Partners, and SVB India Capital Partners. iYogi was recently awarded the Red Herring Global 100 Award, recognizing it as one of the 100 most innovative private companies driving the future of technology. For more information on iYogi and a detailed list of technologies supported, visit: www.iyogi.ca.
ABOUT CLEAN MACHINE
Clean Machine Inc. is a NJ-based and incorporated company that helps consumers and small business owners easily manage and protect their computing environments safely and cost effectively. The company is has a unique, powerful and inexpensive PC concierge service. Specifically, each customer is assigned a highly-trained tech concierge who remotely examines their computer system on a scheduled and very secure basis. The PC concierge will immediately fix software-based problems and prevent new threats to the customer's computing environment including offensive pop-ups, browser redirects and slow performance, and then provides a detailed report. Clean Machine's proprietary Radar(TM) technology (Remote Access Detection Audit and Repair) allows its expert technicians to remotely resolve any problems, eliminating the need for customers to go through the frustrating process of speaking with a tech support expert, and still having to do the work themselves. In other words, the Clean Machine PC concierges do it all. For more information on Clean Machine please visit www.pccleanmachine.com.
CONTACT:
iYogi Contact
Vishal Dhar
President Marketing
iYogi Inc.
Phone: 212 229 0901
Email: vishal@iyogi.net
The Press Release is available at its source:
iYogi acquires Clean Machine Inc.
This post describes how to use the Printing Troubleshooter that is included in
Microsoft Windows XP Help and Support Center. This post also provides a list of
online printer support services that may help you solve your printing problem.
The Printing Troubleshooter includes step-by-step instructions for troubleshooting the following printing problems in Windows XP: ? You cannot install a local printer. ? Your photo printout quality is poor. ? Your document does not print at all. ? Some of the features that came with your printer do not work. ? Printed text or graphics is incomplete. ? Fonts are missing or do not look the same as they do on the screen. ? Printing is unusually slow. ? You cannot print from an MS-DOS-based program or from the MS-DOS command prompt. ? You receive the following error message: The printer driver is not compatible with a policy enabled on your computer that blocks Windows NT 4.0 or Windows 2000 kernel-mode drivers.
How to start the Printing Troubleshooter 1. Click Start , and then click Help and Support.
2. Under Pick a Help Topic, click Fixing a problem.
3. In the left pane, click Printing problems.
4. In the right pane, click Printing Troubleshooter .
How to use the Printing Troubleshooter 1. Click the option that describes the problem that is occurring, and then click Next .
2. Repeat step 1 until your problem is resolved or you have reached the end of the troubleshooting path. Note that you can click Back at any time to repeat the last step, or click Start Over to start the Printing Troubleshooter again.
This post privide tips to
fix Printer error, If You cannot add a printer, unable start print job Lexmark print service LexBce Server lexmark printer
Error: Spooler subsystem app has encountered a problem and needs to close. Operation could not be completed. unable start print job Lexmark print service LexBce Server lexmark printer
This issue may occur if a third-party printer driver or a third-party service that is installed prevents you from adding printers, or if the third-party printer driver or the third-party service affects the functionality of a newly installed printer.
For example, this issue may occur if the Lexmark print service (LexBce Server service) is installed and is running on your computer before you try to add another printer.
ResolutionYou may experience any of the following symptoms on your Windows XP-based computer:
? After you start your computer, you may receive the following error message:
Spooler subsystem app has encountered a problem and needs to close.
? When you try to start the Print Spooler service, you may receive the following error message:
Spooler subsystem app has encountered a problem and needs to close.
? When you try to stop the Print Spooler service, you may receive the following error message:
Spooler subsystem app has encountered a problem and needs to close.
? When you click Start, and then click Printers and Faxes, you may receive the following error message:
Spooler subsystem app has encountered a problem and needs to close.
? When you click Start, and then click Printers and Faxes to try to view your printers, no printers appear. This issue may occur even if you have a printer installed.
? When you click Add a printer, or when you try to print, you may receive the following error message and cannot add a printer:
Operation could not be completed.
For More Information Contact to
Printer Support Expert
Here
 Ink tanks need to be installed in a certain arrangement, as noted in your printer’s user guide. For the Canon Pixma, the proper arrangement from left to right is Black 8, Black 5, Yellow 8, Magenta 8, and Cyan 8.
 Tear the plastic wrapper off the ink tank by pulling down on the orange strip. Be careful not to touch the metal chip at the bottom of the tank.
 Take off the protective plastic cap by turning the plastic handle counterclockwise.
 Turn your printer on, and lift the cover. Make sure you're not just lifting the top cover that provides access to the glass copy plate. Lift from below the control panel.
 The ink-tank tray will move toward the center of the printer, giving access to the ink-jet tanks. Open the inner cover by pulling it toward you.
 Push the front of the ink tank until the tank snaps into place. It will light up when it’s in correctly.
 Push the inner cover closed before closing the printer cover.
 Gently close the printer cover until it locks in place.
