This post provides
printer support to general troubleshooting of Dot Matrix Printers.
• If the printer self-tests OK but will not print jobs from the computer, check the following:
- Dip switch settings
- Proper driver for your application software
- Bad or disconnected cable
• Some printers have both serial and parallel connections. If one doesn't work, change cables and try the other. Be sure to change any dip switch settings needed by the printer to recognize the change. If this works, you may have had a physical problem with the output port on the computer or the input port of the printer that you tried the first time.
• If a dot matrix printer shuts down and recovers frequently, it may be having problems with its "thermistor". A thermistor is a device used to keep the printer from overheating. Try replacing this part before you replace the entire print head.
• Some printers can be set by dip switches for unidirectional or bidirectional printing. Bidirectional is normally faster, but might cause problems with graphic output for some combinations of applications and printers. If you suspect this problem, reset your dip switches for unidirectional printing.
• If your output is double-spaced when you expect single-spaced, you may be getting an extra Carriage Return and Line Feed at the end of every line.Reset the dip switch(es) controlling this.
• If your print quality is poor, first check the ribbon for wear. Also examine the print head spacing. Your head may be too far away from the platen for your current paper thickness. If adjusting the spacing doesn't solve the problem, clean the print head itself with a cotton swab dipped lightly in alcohol.
This Post provide
printer support to print CD/DVD Label I try to describe step by step instruction
To begin printing on a CD or DVD, press the CD Print button. Printing directly onto a CD or DVD using the Epson Stylus Photo RX680 inkjet printer couldn’t be easier, and the results are fantastic. This Step-By-Step guide will demonstrate how to do it. Note that you need to make sure the CD or DVD you’re using can be printed on; check the label before you buy. Also, make sure you have already burned to the disk; once you’ve put the label on, you can’t burn data to the disk.
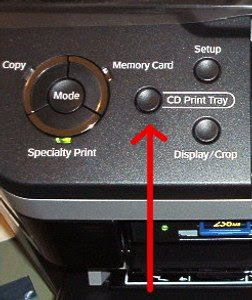
To begin the process of printing directly onto a CD or DVD, press the CD Print Tray button. This will raise the CD/DVD tray to raise into position.
Load the CD or DVD into the holder
Load the CD or DVD onto the holder. The white side should be facing up. Remember that the disk should already be full of data; once you print on it, you won’t be able to burn data to it.
Load holder into the printer tray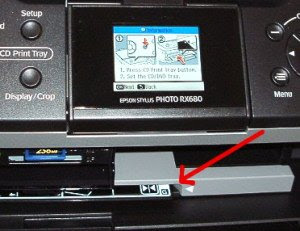
Slide the holder into the CD/DVD tray to left of the arro
Press OK to get the disk in place for printing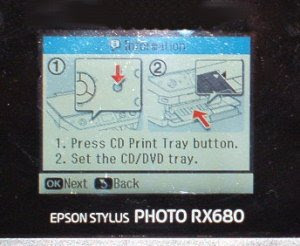
Press OK to get the disk in place for printing.
 Choose the photo you want to use as the label
Choose the photo you want to print as the label. In this example, the memory card (in red box) holds the image I want to print, but you can get the image from your computer as well. If the image needs any simple editing, use the Auto Correct function. You’ll be able to move the outline of the CD around the photo here, or make the image bigger or smaller to fit better. Remember that nothing will print across the center.
Press Start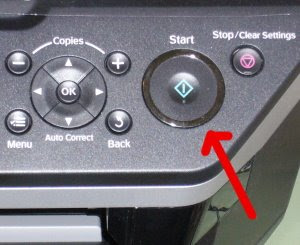
Press Start and the printing will begin.
Remove CD from the tray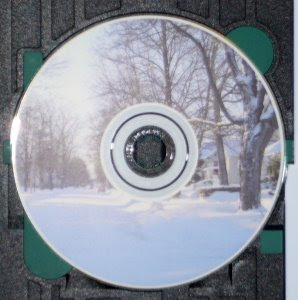
When it finishes printing, remove the CD or DVD from the tray and you're finished!


