
Your about to print an important document that you need for work or school and as you hit that print button, a windows error that says "Operation could not be completed. The print spooler service is not running". What to do now? Well here are a couple tricks that will fix this problem. This post provides printer support to fix print spooler problems
Follow the steps to fix Print Spooler Error
Click on Start then click on Run. In the dialog box type services.msc and click OK, this will bring the services window up. Scroll down to print spooler, of course just turning it on wont fix it but we do want to make sure that the start up type set to automatic. double click on the Print Spooler Service and set start up type to Automatic, then click OK.
Restart the machine. Then once the machine is back up reinstall the software that came with the printer. If you don't have it you can always go to the vendors website and download it.
If that doesn't fix the problem we are going to want to completely uninstall all the software for the printer and reinstall it. So click on Start then Run type Control Panel in the dialog box and click OK. Click on add remove programs and uninstall the software for the printer.
Then check Under the Printer and Fax to see if it was uninstalled. If not then just delete it. Printer and Fax is in the Control Panel. Once it is completely uninstalled reinstall the software for the printer.
Then check Under the Printer and Fax to see if it was uninstalled. If not then just delete it. Printer and Fax is in the Control Panel.
Showing posts with label fix print spooler prolblems. Show all posts
Showing posts with label fix print spooler prolblems. Show all posts

 This Post provide printer support to print CD/DVD Label I try to describe step by step instruction
To begin printing on a CD or DVD, press the CD Print button.
Printing directly onto a CD or DVD using the Epson Stylus Photo RX680 inkjet printer couldn’t be easier, and the results are fantastic. This Step-By-Step guide will demonstrate how to do it. Note that you need to make sure the CD or DVD you’re using can be printed on; check the label before you buy. Also, make sure you have already burned to the disk; once you’ve put the label on, you can’t burn data to the disk.
To begin the process of printing directly onto a CD or DVD, press the CD Print Tray button. This will raise the CD/DVD tray to raise into position.
Load the CD or DVD into the holder
 Load the CD or DVD onto the holder. The white side should be facing up. Remember that the disk should already be full of data; once you print on it, you won’t be able to burn data to it.
Load holder into the printer tray
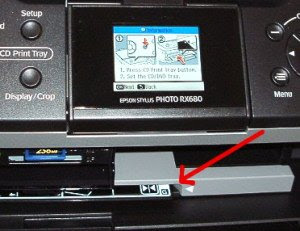
Slide the holder into the CD/DVD tray to left of the arro
Press OK to get the disk in place for printing
 Press OK to get the disk in place for printing.
Choose the photo you want to use as the label
Choose the photo you want to print as the label. In this example, the memory card (in red box) holds the image I want to print, but you can get the image from your computer as well. If the image needs any simple editing, use the Auto Correct function. You’ll be able to move the outline of the CD around the photo here, or make the image bigger or smaller to fit better. Remember that nothing will print across the center.
Press Start
 Press Start and the printing will begin.
Remove CD from the tray
 When it finishes printing, remove the CD or DVD from the tray and you're finished!
This post provide printer support to Install new ink tank. To Install new ink tank follow the step given below
Check the Proper Order of the Tanks
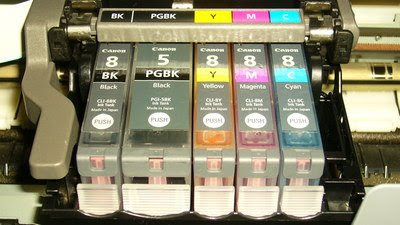 Ink tanks need to be installed in a certain arrangement, as noted in your printer’s user guide. For the Canon Pixma, the proper arrangement from left to right is Black 8, Black 5, Yellow 8, Magenta 8, and Cyan 8.
Remove the Plastic Wrapper from the Ink Tank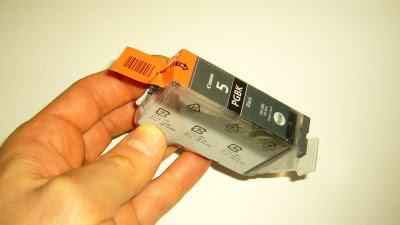 Tear the plastic wrapper off the ink tank by pulling down on the orange strip. Be careful not to touch the metal chip at the bottom of the tank.
Remove the Orange Protective Cap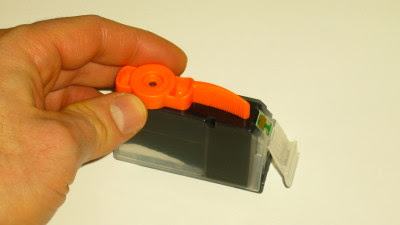 Take off the protective plastic cap by turning the plastic handle counterclockwise.
Turn the Printer On and Lift the Cover
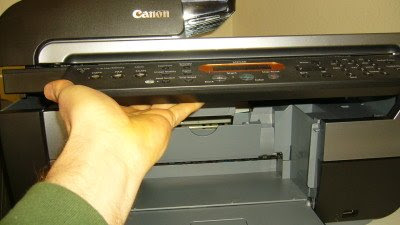 Turn your printer on, and lift the cover. Make sure you're not just lifting the top cover that provides access to the glass copy plate. Lift from below the control panel.
Open the Inner Cover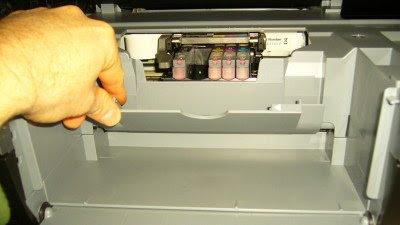 The ink-tank tray will move toward the center of the printer, giving access to the ink-jet tanks. Open the inner cover by pulling it toward you.
Push the Ink Tank Into Place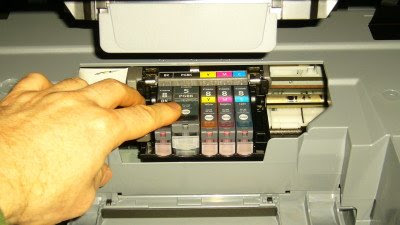 Push the front of the ink tank until the tank snaps into place. It will light up when it’s in correctly.
Close the Inner Cover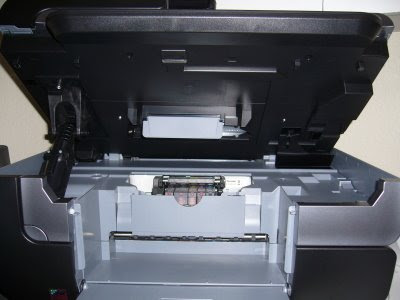 Push the inner cover closed before closing the printer cover.
Close the Printer Cover
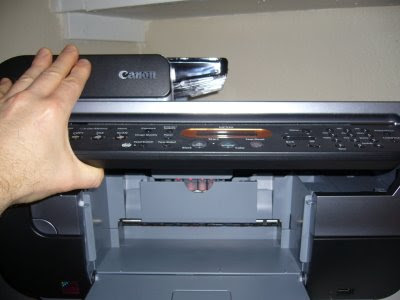 Gently close the printer cover until it locks in place.
Check the Proper Order of the Tanks
Ink tanks need to be installed in a certain arrangement, as noted in your printer’s user guide. For the Canon Pixma, the proper arrangement from left to right is Black 8, Black 5, Yellow 8, Magenta 8, and Cyan 8.Remove the Plastic Wrapper from the Ink Tank
 Tear the plastic wrapper off the ink tank by pulling down on the orange strip. Be careful not to touch the metal chip at the bottom of the tank.
Remove the Orange Protective Cap
 Take off the protective plastic cap by turning the plastic handle counterclockwise.
Turn the Printer On and Lift the Cover
 Turn your printer on, and lift the cover. Make sure you're not just lifting the top cover that provides access to the glass copy plate. Lift from below the control panel.
Open the Inner Cover
 The ink-tank tray will move toward the center of the printer, giving access to the ink-jet tanks. Open the inner cover by pulling it toward you.
Push the Ink Tank Into Place
 Push the front of the ink tank until the tank snaps into place. It will light up when it’s in correctly.
Close the Inner Cover
 Push the inner cover closed before closing the printer cover.
Close the Printer Cover
Gently close the printer cover until it locks in place.
This post provide printer support tips and trick for troubleshoot printer problems.If you can not add a printer and receive printer spooler problem to fix it make a tour Fix print spooler tips.
Any print job spooled to a printer is written as a temporary file to the %systemroot%\System32\Spool\Printers folder. The file is deleted after the printer indicates that the job has been printed. The primary print spool problem encountered is a lack of available disk space. If you print high-resolution graphics, you might have print jobs as large as 20 MB to 80 MB per file for a 32-bit image at standard page size. Not surprisingly, it doesn’t take many print jobs to overwhelm the typical Windows NT Workstation configuration.
When you print to the spooler, you create two files for each print job. The .SPL file is the actual print job spool file. You also create a shadow file, given the .SHD extension. The shadow file contains additional information about the print job that is not part of the print job itself, such as owner, priority, and so forth. If your computer crashes, .SPL and .SHD files remain in the default spool file until the service restarts and they are processed and printed. After being printed, these files are deleted from disk.
Should your spooled files become corrupted, they will be orphaned and remain in the spool folder taking up valuable space.
You can print directly to a printer from your application by turning off the print spooling feature. Before you print, open the Scheduling tab of the Printer Properties dialog box and select the Print directly to the printer radio button. When the printer next becomes available, your document prints. Until that point, you cannot use the application that originates the print job. You can task switch to another application and continue working until your printing application becomes available.
Any print job spooled to a printer is written as a temporary file to the %systemroot%\System32\Spool\Printers folder. The file is deleted after the printer indicates that the job has been printed. The primary print spool problem encountered is a lack of available disk space. If you print high-resolution graphics, you might have print jobs as large as 20 MB to 80 MB per file for a 32-bit image at standard page size. Not surprisingly, it doesn’t take many print jobs to overwhelm the typical Windows NT Workstation configuration.
When you print to the spooler, you create two files for each print job. The .SPL file is the actual print job spool file. You also create a shadow file, given the .SHD extension. The shadow file contains additional information about the print job that is not part of the print job itself, such as owner, priority, and so forth. If your computer crashes, .SPL and .SHD files remain in the default spool file until the service restarts and they are processed and printed. After being printed, these files are deleted from disk.
Should your spooled files become corrupted, they will be orphaned and remain in the spool folder taking up valuable space.
You can print directly to a printer from your application by turning off the print spooling feature. Before you print, open the Scheduling tab of the Printer Properties dialog box and select the Print directly to the printer radio button. When the printer next becomes available, your document prints. Until that point, you cannot use the application that originates the print job. You can task switch to another application and continue working until your printing application becomes available.
Subscribe to:
Posts (Atom)